Real-time notifications have become a big part of modern applications. They enable applications to push updates to users instantly and are essential in scenarios such as:
- Messaging apps: delivering chat messages.
- Financial services: live stock price updates.
- Social media: notifying users about likes, comments, or shares.
- Online gaming: updating game states in multiplayer games.
Implementing real-time features improves user engagement and gives us a competitive edge. It’s one of the most common use cases for WebSockets.
However, building a WebSockets system that can scale to millions of concurrent users is no small task!
Fortunately, many SaaS providers offer managed WebSockets solutions these days. AWS, for instance, supports WebSockets through API Gateway, AppSync and IoT Core. All these options charge for both messages and connection time.
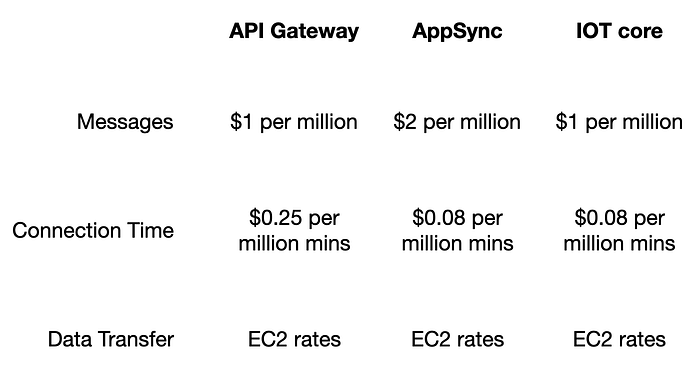
Unfortunately, that means paying for idle connections, and it can be costly for many applications where updates are infrequent.
Take social networks, for example; 10% of users likely produce 90% of the content, and the median user has only a few followers. So, for most of their users, the connection time cost is wasted because the user receives little to no push updates.
Wouldn’t it be nice if our WebSockets cost better match our actuate usage, i.e. the no. of messages we send?
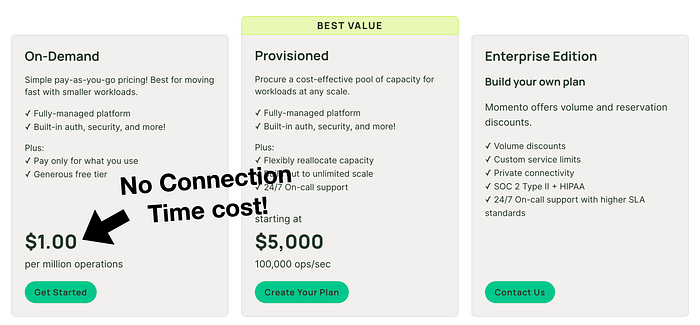
Well, that’s where Momento Topics [1] come in!
It abstracts away the hard parts of WebSockets and has an on-demand pricing that doesn’t charge for connections.
In this guide, we’ll build a real-time notification system using Momento Topics. Along the way, I will demonstrate how to implement fine-grained authorization so users can only subscribe to their own updates.
All the code for this demo is available in this repo [2].
Pre-requisites
Here are the pre-requisites for this guide:
- A Momento account: Sign up for a free account at console.gomomento.com [3].
- An AWS account.
- Node.js.
- CDK v2.
A note about Momento Topics
An important thing to note about Momento Topics is that they are virtual. In that, we don’t have to explicitly create a topic first before we use it.
Keep this in mind as we go through this step-by-step guide.
Understanding disposable tokens
Momento has two separate mechanisms for authentication and authorization—API keys and disposable tokens.
For back-end processes, use API keys.
For the front-end, we can generate disposable tokens using the Momento SDK [4]. These tokens can be scoped to specific actions against specific resources.
For example, a token can grant subscribe-only permission to a specific topic. If every user has their own topic, then we can use disposable tokens to allow a user to subscribe to only their topic.
Architecture overview
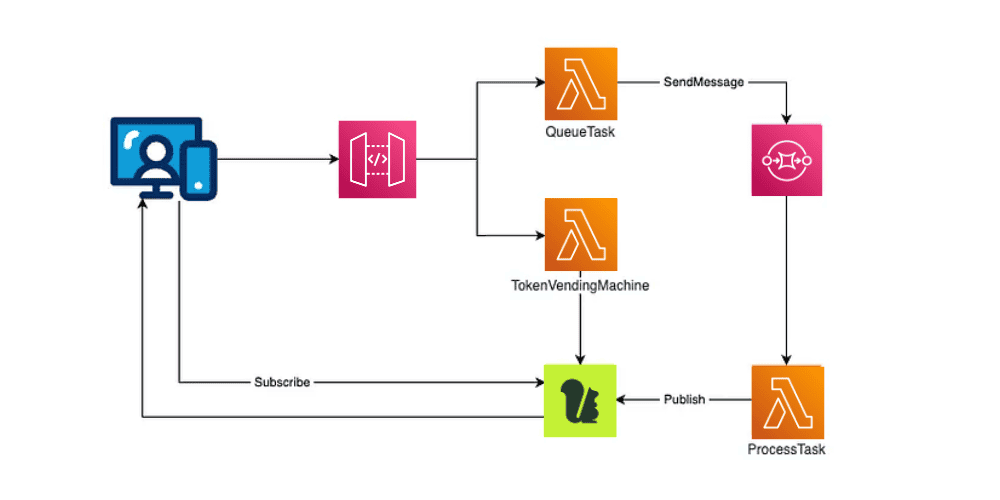
For this demo, we will build a full-stack application where:
- The front-end queues a task against an API.
- The task is pushed to a SQS queue to be processed asynchronously.
- The back-end processes the task and notifies the front end (via a Momento Topic) when the task is complete.
The API has two routes:
- POST /task: queues a task to be processed.
- GET /token: generates a disposable token so the front end can subscribe to the Momento Topic.
Here is our overall architecture:
Step 1: Creating a new cache
Momento Topics share the same infrastructure as Momento Cache. So to use topics, we have to first create a cache, odd as it may sound.
Log into the Momento Console [3] and go to “Caches”.

Click “Create cache”.
We will call this new cache “notifications” and create it in the “us-east-1” region.
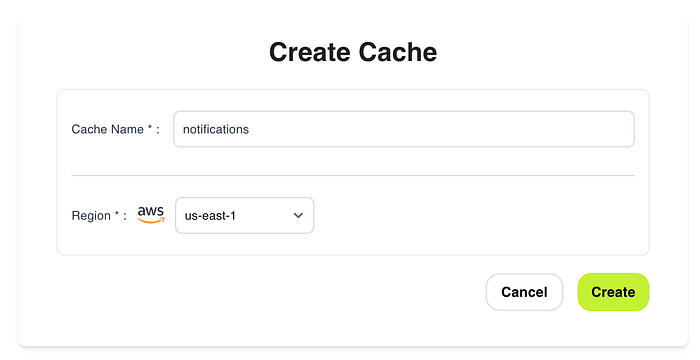
This can also be done through the Momento CLI [5].
Step 2: Generate API key
Momento has two types of API keys:
- Super User Key: This is used to administer caches and topics and generate disposable tokens.
- Fine-Grained Access Key: This is for interacting with Moment caches/topics.
A super user key is required to generate disposable tokens. But we only need a fine-grained access key to publish messages to a topic.
In practice, we should create two keys, one for each endpoint. But for the sake of brevity, we will create only a super user key.
Go to “API keys” in the Momento console and generate a new “Super User Key” in the “us-east-1” region.
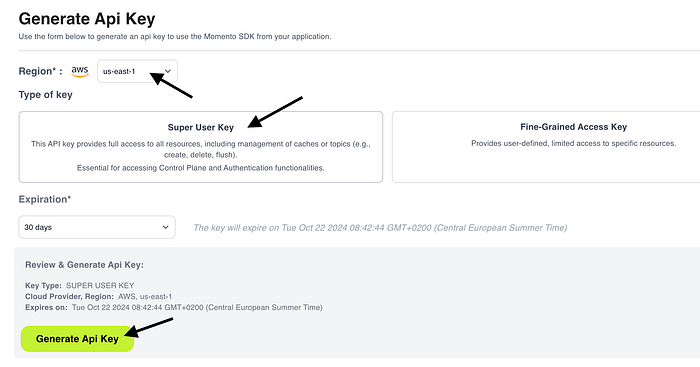
Click “Generate Api Key”.
Step 3: Secure the API key
To keep our API key safe, we will store it in the SSM Parameter Store.
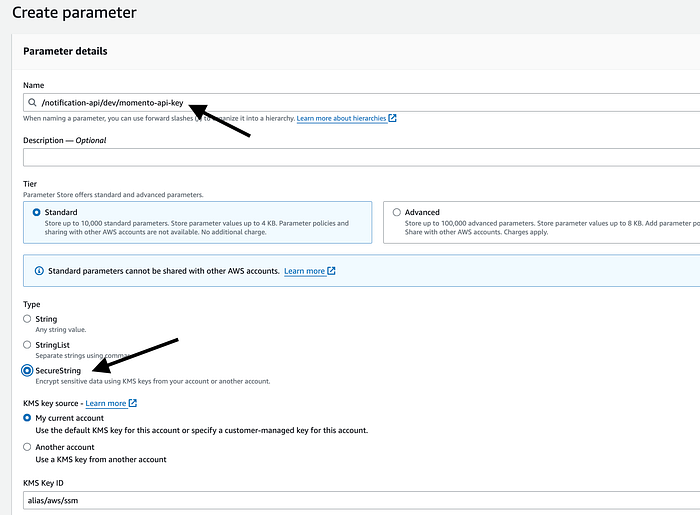
Go to the “AWS Systems Manager” console in AWS, click “Parameter Store”.

Create a new parameter, and call the new parameter “/notification-api/dev/momento-api-key”. This is the naming convention I typically use for SSM parameters: /{service-name}/{environment}/{parameter-name}.
Make sure the parameter type is “SecureString”. This ensures the API key is encrypted at rest.
Step 4: Create a CDK app
For this demo, we will use CDK. But we can use any other Infrastructure-as-Code tool, and it will work just as well.
For the CDK app, I want to:
- Support ephemeral environments [6], one of the most impactful practices for serverless development.
- Allow ephemeral environments to reuse SSM parameters [7] from one of the main environments (e.g. dev).
So, we will take in two context variables: stageName and ssmStageName.
The stageName is included in the name of every AWS resource we create to avoid name clashes.
The ssmStageName is used in place of the stageName in every SSM parameter we reference.
With these in mind, here is the CDK app.
#!/usr/bin/env node

const cdk = require('aws-cdk-lib');
const { NotificationApiStack } = require('./constructs/notification-api-stack');

const app = new cdk.App();

let stageName = app.node.tryGetContext('stageName');
let ssmStageName = app.node.tryGetContext('ssmStageName');

if (!stageName) {
  console.log('Defaulting stage name to dev');
  stageName = 'dev';
}

if (!ssmStageName) {
  console.log(`Defaulting SSM stage name to "stageName": ${stageName}`);
  ssmStageName = stageName;
}

const serviceName = 'notification-api';

new NotificationApiStack(app, `NotificationApiStack-${stageName}`, {
  serviceName,
  stageName,
  ssmStageName,
});
And here is the NotificationApiStack:
const { Stack, Duration, CfnOutput } = require('aws-cdk-lib');
const { Runtime } = require('aws-cdk-lib/aws-lambda');
const { NodejsFunction } = require('aws-cdk-lib/aws-lambda-nodejs');
const { RestApi, LambdaIntegration, CfnAuthorizer, AuthorizationType } = require('aws-cdk-lib/aws-apigateway');
const iam = require('aws-cdk-lib/aws-iam');
const sqs = require('aws-cdk-lib/aws-sqs');
const { SqsEventSource } = require('aws-cdk-lib/aws-lambda-event-sources');
const { UserPool, UserPoolClient } = require('aws-cdk-lib/aws-cognito');

const MOMENTO_CACHE_NAME = 'notifications';

class NotificationApiStack extends Stack {
  constructor(scope, id, props) {
    super(scope, id, props);

    const api = new RestApi(this, `${props.stageName}-NotificationApi`, {
      deployOptions: {
        stageName: props.stageName,
        tracingEnabled: true
      }
    });

    const userPool = new UserPool(this, 'CognitoUserPool', {
      userPoolName: `${props.serviceName}-${props.stageName}-UserPool`,
      selfSignUpEnabled: true,
      signInAliases: { email: true }
    });

    const webUserPoolClient = new UserPoolClient(this, 'WebUserPoolClient', {
      userPool,
      authFlows: {
        userSrp: true
      },
      preventUserExistenceErrors: true
    });

    new CfnOutput(this, 'UserPoolId', { value: userPool.userPoolId });
    new CfnOutput(this, 'UserPoolClientId', { value: webUserPoolClient.userPoolClientId });

    this.momentoApiKeyParamName = `/${props.serviceName}/${props.ssmStageName}/momento-api-key`;
    this.momentoApiKeyParamArn = `arn:aws:ssm:${this.region}:${this.account}:parameter${this.momentoApiKeyParamName}`;

    this.taskQueue = this.createTaskQueue(props);

    this.createProcessTaskFunction(props);

    const queueTaskFunction = this.createQueueTaskFunction(props);
    const tokenVendingMachineFunction = this.createTokenVendingMachineFunction(props);

    this.createApiEndpoints(api, userPool, {
      queueTask: queueTaskFunction,
      tokenVendingMachine: tokenVendingMachineFunction
    });
  }

  createTaskQueue(props) {
    return new sqs.Queue(this, 'TaskQueue', {
      queueName: `${props.serviceName}-${props.stageName}-tasks`
    });
  }

  createQueueTaskFunction(props) {
    const func = new NodejsFunction(this, 'QueueTaskFunction', {
      runtime: Runtime.NODEJS_20_X,
      handler: 'handler',
      entry: 'functions/queue-task.js',
      memorySize: 1024,
      environment: {
        SERVICE_NAME: props.serviceName,
        STAGE_NAME: props.stageName,
        POWERTOOLS_LOG_LEVEL: props.stageName === 'prod' ? 'INFO' : 'DEBUG',
        TASK_QUEUE_URL: this.taskQueue.queueUrl
      }
    });

    this.taskQueue.grantSendMessages(func);

    return func;
  }

  createProcessTaskFunction(props) {
    const func = new NodejsFunction(this, 'ProcessTaskFunction', {
      runtime: Runtime.NODEJS_20_X,
      handler: 'handler',
      entry: 'functions/process-task.js',
      memorySize: 1024,
      timeout: Duration.seconds(10),
      environment: {
        SERVICE_NAME: props.serviceName,
        STAGE_NAME: props.stageName,
        MOMENTO_API_KEY_PARAM_NAME: this.momentoApiKeyParamName,
        MOMENTO_CACHE_NAME,
        POWERTOOLS_LOG_LEVEL: props.stageName === 'prod' ? 'INFO' : 'DEBUG'
      }
    });

    func.addEventSource(new SqsEventSource(this.taskQueue, {
      reportBatchItemFailures: true
    }));

    func.role.attachInlinePolicy(new iam.Policy(this, 'ProcessTaskFunctionSsmPolicy', {
      statements: [
        new iam.PolicyStatement({
          effect: iam.Effect.ALLOW,
          actions: [ 'ssm:GetParameter*' ],
          resources: [ this.momentoApiKeyParamArn ]
        })
      ]
    }));

    return func;
  }

  createTokenVendingMachineFunction(props) {
    const func = new NodejsFunction(this, 'TokenVendingMachineFunction', {
      runtime: Runtime.NODEJS_20_X,
      handler: 'handler',
      entry: 'functions/token-vending-machine.js',
      memorySize: 1024,
      environment: {
        SERVICE_NAME: props.serviceName,
        STAGE_NAME: props.stageName,
        MOMENTO_API_KEY_PARAM_NAME: this.momentoApiKeyParamName,
        MOMENTO_CACHE_NAME,
        POWERTOOLS_LOG_LEVEL: props.stageName === 'prod' ? 'INFO' : 'DEBUG'
      }
    });

    func.role.attachInlinePolicy(new iam.Policy(this, 'TokenVendingMachineFunctionSsmPolicy', {
      statements: [
        new iam.PolicyStatement({
          effect: iam.Effect.ALLOW,
          actions: [ 'ssm:GetParameter*' ],
          resources: [ this.momentoApiKeyParamArn ]
        })
      ]
    }));

    return func;
  }

  /**
   *
   * @param {RestApi} api
   * @param {UserPool} userPool
   */
  createApiEndpoints(api, userPool, functions) {
    const authorizer = new CfnAuthorizer(this, 'CognitoAuthorizer', {
      name: 'CognitoAuthorizer',
      type: 'COGNITO_USER_POOLS',
      identitySource: 'method.request.header.Authorization',
      providerArns: [userPool.userPoolArn],
      restApiId: api.restApiId,
    });

    // POST /task
    const taskResource = api.root.addResource('task');
    taskResource.addMethod('POST', new LambdaIntegration(functions.queueTask), {
      authorizer: {
        authorizationType: AuthorizationType.COGNITO,
        authorizerId: authorizer.ref
      }
    });

    taskResource.addCorsPreflight({
      allowHeaders: ['*'],
      allowMethods: ['OPTIONS', 'POST'],
      allowCredentials: true,
      allowOrigins: ['*']
    });

    // GET /token
    const tokenResource = api.root.addResource('token');
    tokenResource.addMethod('GET', new LambdaIntegration(functions.tokenVendingMachine), {
      authorizer: {
        authorizationType: AuthorizationType.COGNITO,
        authorizerId: authorizer.ref
      }
    });

    tokenResource.addCorsPreflight({
      allowHeaders: ['*'],
      allowMethods: ['OPTIONS', 'POST'],
      allowCredentials: true,
      allowOrigins: ['*']
    });
  }
}

module.exports = { NotificationApiStack }
Here, we created an API in API Gateway and two Lambda functions to implement the aforementioned routes:
- TokenVendingMachineFunction
- QueueTaskFunction
SQS message processing
The QueueTaskFunction handles requests to the POST /task endpoint and enqueues tasks to the taskQueue SQS queue. Which the ProcessTaskFunction will process in batches of 10 (the default for SQS event-source mapping).
Notice that reportBatchItemFailures is enabled to handle partial batch failures [8].
func.addEventSource(new SqsEventSource(this.taskQueue, {
  reportBatchItemFailures: true
}));
Authentication and Authorization
The API is secured by a Cognito authorizer.
const authorizer = new CfnAuthorizer(this, 'CognitoAuthorizer', {
  name: 'CognitoAuthorizer',
  type: 'COGNITO_USER_POOLS',
  identitySource: 'method.request.header.Authorization',
  providerArns: [userPool.userPoolArn],
  restApiId: api.restApiId,
});
So when the QueueTaskFunction is invoked by API Gateway, we can find the user’s Cognito sub in the invocation event.
We will use this as the user’s unique ID and the name of the user-specific topic. When we enqueue the SQS message, we must include this piece of information so the ProcessTaskFunction knows which topic to publish the results to.
Loading SSM parameters securely
Notice that our functions did not include the Momento API key as an environment variable. Instead, we pass along the name of the parameter:
environment: {
  SERVICE_NAME: props.serviceName,
  STAGE_NAME: props.stageName,
  MOMENTO_API_KEY_PARAM_NAME: this.momentoApiKeyParamName,
  MOMENTO_CACHE_NAME,
  POWERTOOLS_LOG_LEVEL: props.stageName === 'prod' ? 'INFO' : 'DEBUG'
}
and we give the function the IAM permission to fetch the parameter at runtime.
func.role.attachInlinePolicy(new iam.Policy(this, 'ProcessTaskFunctionSsmPolicy', {
  statements: [
    new iam.PolicyStatement({
      effect: iam.Effect.ALLOW,
      actions: [ 'ssm:GetParameter*' ],
      resources: [ this.momentoApiKeyParamArn ]
    })
  ]
}));
This is so that:
- We protect ourselves against compromised dependencies from stealing information from environment variables.
- We can use short expirations for our API keys and rotate them without redeploying the application.
During cold start, a function will fetch the SSM parameter, decrypt it and cache its value for a few minutes. After the cache expiry, the next invocation will attempt to fetch an updated value from the SSM Parameter store.
This way, we don’t need to call SSM on every invocation. When we rotate the API key in the background (with a cron job), our functions automatically pick up the new key after its cache expires.
Luckily, Middy’s ssm middleware [9] supports this flow out-of-the-box. We will let it handle the heavy lifting, but more on this later!
Example workflow
When I start working on a JIRA ticket “ABP-1734”, I will:
- Create a feature branch
ABP-1734. - Create an ephemeral environment by running
cdk deploy --context stageName=FEAT-ABP-1734 --context ssmStageName=dev. This creates a new instance of our notification service so I can work on my changes in isolation. This new environment will use thedevSSM parameters, but all its resources will have theFEAT-ABP-1734suffix. - I make my changes, test them and create a PR.
- I delete the ephemeral environment by running
cdk destroy --context stageName=FEAT-ABP-1734 --context ssmStageName=dev.
These short-lived environments are useful for feature development as well as running tests in CI/CD pipelines. Thanks to pay-per-use pricing, we can have as many environments as we need without incurring additional costs.
Ideally, we’d have one Momento cache per environment, too. In that case, the name of the cache should be prefixed or suffixed with stageName.
Step 5: Implement the TokenVendingMachine function
Here’s the code for the TokenVendingMachine function behind the GET /token route:
const { initAuthClient, generateToken } = require('../lib/momento');
const middy = require('@middy/core');
const cors = require('@middy/http-cors');
const ssm = require('@middy/ssm');

const handler = async (event, context) => {
  await initAuthClient(context.MOMENTO_API_KEY);

  const userId = event.requestContext.authorizer.claims.sub;
  const tokenResult = await generateToken(userId);

  return {
    statusCode: 200,
    body: JSON.stringify(tokenResult)
  }
}

module.exports.handler = middy(handler)
.use(cors())
.use(ssm({
  cache: true,
  cacheExpiry: 5 * 60 * 1000,
  setToContext: true,
  fetchData: {
    MOMENTO_API_KEY: process.env.MOMENTO_API_KEY_PARAM_NAME
  }
}));
Here, we use Middy’s ssm middleware [9] to fetch and cache the Momento API key from SSM Parameter Store.
.use(ssm({
  cache: true,
  cacheExpiry: 5 * 60 * 1000,
  setToContext: true,
  fetchData: {
    MOMENTO_API_KEY: process.env.MOMENTO_API_KEY_PARAM_NAME
  }
}));
By default, the middleware injects the fetched data into environment variables. However, as stated before, we should avoid putting unencrypted API keys in the Lambda functions’ environment variables. Attackers would often scan environment variables for sensitive information.
So, we ask the middleware to set the fetched data to Lambda’s invocation context object instead. Therefore, when we initialize the Momento client, we have to get the Momento API key from context.MOMENTO_API_KEY.
await initAuthClient(context.MOMENTO_API_KEY);Encapsulating shared logic
As per the earlier snippet, I have encapsulated all the Momento-related operations into a shared momento.js module.
This includes shared logic, such as initializing a Momento auth client.
const {
  CredentialProvider,
  AuthClient,
  DisposableTokenScopes,
  ExpiresIn,
  GenerateDisposableTokenResponse
} = require('@gomomento/sdk');

const { Logger } = require('@aws-lambda-powertools/logger');
const logger = new Logger({ serviceName: 'notification-api' });

const { MOMENTO_CACHE_NAME } = global.process.env;

let authClient;

async function initAuthClient(apiKey) {
  if (!authClient) {
    logger.info('Initializing Momento auth client');

    authClient = new AuthClient({
      credentialProvider: CredentialProvider.fromString(apiKey)
    });

    logger.info('Initialized Momento auth client');
  }
};

async function generateToken(userId) {
  const result = await authClient.generateDisposableToken(
    DisposableTokenScopes.topicSubscribeOnly(MOMENTO_CACHE_NAME, userId),
    ExpiresIn.minutes(30)
  );

  return {
    endpoint: result.endpoint,
    token: result.authToken,
    cacheName: MOMENTO_CACHE_NAME,
    expiresAt: result.expiresAt
  };
}
Here, we are taking advantage of the fact that Lambda execution environments are reused.
When a new execution environment is created (during a cold start), the authClient variable is set. On subsequent invocations on the same execution environment, the initAuthClient function will short-circuit and return right away.
Fine-grained authorization
Pay attention to this line:
const result = await authClient.generateDisposableToken(
  DisposableTokenScopes.topicSubscribeOnly(MOMENTO_CACHE_NAME, userId),
  ExpiresIn.minutes(30)
);
Here, we are generating a short-lived token that has very limited permissions. It can only subscribe to a topic whose name matches the user’s Cognito sub.
This is how we stop users from subscribing to other users’ updates.
Step 6: Implement the QueueTask function
Here’s the code for the QueueTask function behind the POST /task route:
const { SQSClient, SendMessageCommand } = require('@aws-sdk/client-sqs');
const sqsClient = new SQSClient();
const middy = require('@middy/core');
const cors = require('@middy/http-cors');

const handler = async (event) => {
  await sqsClient.send(new SendMessageCommand({
    QueueUrl: process.env.TASK_QUEUE_URL,
    MessageBody: JSON.stringify({
      userId: event.requestContext.authorizer.claims.sub,
      payload: event.body
    })
  }));

  return {
    statusCode: 202,
  };
};

module.exports.handler = middy(handler)
.use(cors());
This function takes the POST body and queues it in SQS for processing. The key thing to note is we also included the user’s Cognito sub as their userId in the SQS message.
MessageBody: JSON.stringify({
  userId: event.requestContext.authorizer.claims.sub,
  payload: event.body
})
Step 7: Implement the ProcessTask function
On the other end of the SQS queue, the ProcessTask function processes the messages and tells the user when their tasks are done.
To simulate a long-running task (hence why we offload it to a queue rather than processing it in the HTTP handler), we will sleep for 5 seconds.
const { initClient, publish } = require('../lib/momento');
const middy = require('@middy/core');
const ssm = require('@middy/ssm');

const handler = async (event, context) => {
  await initClient(context.MOMENTO_API_KEY);

  for (const record of event.Records) {
    const { body } = record;
    const task = JSON.parse(body);
    const payload = JSON.parse(task.payload);

    await sleep(5000);

    await publish(task.userId, `Finished task: ${payload.data}`);
  }
};

function sleep(ms) {
  return new Promise((resolve) => setTimeout(resolve, ms));
}

module.exports.handler = middy(handler)
.use(ssm({
  cache: true,
  cacheExpiry: 5 * 60 * 1000,
  setToContext: true,
  fetchData: {
    MOMENTO_API_KEY: process.env.MOMENTO_API_KEY_PARAM_NAME
  }
}));
This is the important line where we publish a message to the user’s topic.
await publish(task.userId, `Finished task: ${payload.data}`);And here’s the corresponding code in the shared momento.js module.
let topicClient;

async function initClient(apiKey) {
  if (!topicClient) {
    logger.info('Initializing Momento topic client');

    topicClient = new TopicClient({
      configuration: TopicConfigurations.Lambda.latest(),
      credentialProvider: CredentialProvider.fromString(apiKey)
    });

    logger.info('Initialized Momento topic client');
  }
}

async function publish(topicName, value) {
  const result = await topicClient.publish(MOMENTO_CACHE_NAME, topicName, value);
}
Step 8: Subscribe to the topic in the frontend
We’re not going to go through all the frontend code in detail because most of it is not relevant to dealing with real-time messaging. All the code is in the demo repo [2] under the frontend directory.
Here are the important bits.
After a user signs in, we:
- Call the
GET /tokenendpoint with the user’s ID token to fetch a disposable token. - Use the token to subscribe to a Momento Topic using our Cognito username (i.e. the
sub) as the topic name
import { Auth } from 'aws-amplify'
import { subscribeToTopic } from '@/lib/momento'
import { createToaster } from '@meforma/vue-toaster'

...

const session = await Auth.currentSession()
const jwtToken = session.getIdToken().getJwtToken()

const getTokenResp = await axios.get(apiConfig.apiUrl + '/token', {
  headers: {
    Authorization: `Bearer ${jwtToken}`
  }
})

const { token, cacheName } = getTokenResp.data

await subscribeToTopic(token, cacheName, user.username, (message) => {
  const toaster = createToaster()
  toaster.show(message, { type: 'success' })
})
Here’s the subscribeToTopic function:
async function subscribeToTopic(authToken, cacheName, userId, onMessage) {
  const topicClient = new TopicClient({
    configuration: TopicConfigurations.Browser.latest(),
    credentialProvider: CredentialProvider.fromString({
      authToken
    })
  })

  console.log('Initialized Momento topic client')
  console.log('Topic name:', userId)

  await topicClient.subscribe(cacheName, userId, {
    onItem: (item => onMessage(item.value()))
  })
}
Note that when we call topicClient.subscribe we must pass along a callback function to handle the incoming messages.
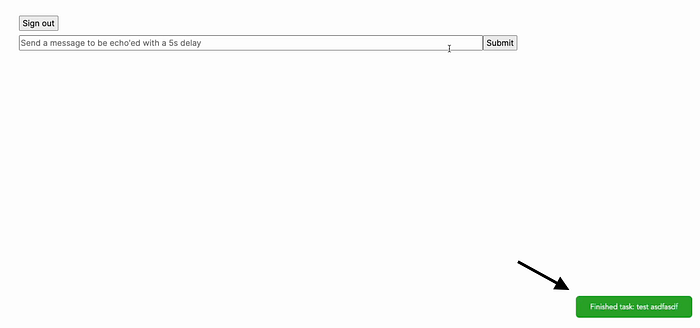
In this case, we take the message and pop up a toaster widget in the corner.
await subscribeToTopic(token, cacheName, user.username, (message) => {
  const toaster = createToaster()
  toaster.show(message, { type: 'success' })
}
Like this:
Step 9: Deploy and Test
Finally, run cdk deploy and test it out!
If you want to see how it works in action, then check out the full course here [10].
Wrap up
Momento Topics is fully serverless and has no uptime cost. We don’t need to manage any infrastructure, and it’s designed for scale!
We can scale our WebSockets application to millions of concurrent users with only a few lines of code.
We have fine-grained access control with disposable tokens.
It’s secure, robust, scalable and cost-efficient.
That’s everything we want from a WebSocket solution!
Links
[1] Learn more about Momento Topics
[2] Demo repo
[3] Momento Console
[4] Momento SDKs
[5] Momento CLI
[6] Serverless Ephemeral Environments Explained
[7] Ephemeral Environments: how to reuse SSM parameters