How to build a real-time chat application with Momento: a step-by-step guide
Build a real-time chat app without the headache of using WebSockets.

Share
Real-time applications have become increasingly popular, and most of us use one or more real-time chat applications, such as WhatsApp.
One of the key challenges with these applications is efficiently managing user connections. We might have a large number of connected users, but these connections are idle most of the time.
Unfortunately, many services that offer WebSockets support (such as API Gateway, AppSync and IoT Core) charge for connection time. It means we have to pay to keep users connected, even when they aren’t actively sending or receiving messages.
This can become very inefficient as our application scales. And that’s where Momento Topics [1] come in!
Momento Topics abstract away the hard parts of WebSockets and have an on-demand pricing that only charges us for what we use.
In this guide, let’s see how we can build a real-time chat application using Momento Topics [1].
All the code for this demo is available in this repo [2].
Pre-requisites
Here are the pre-requisites for this guide:
- A Momento account: Sign up for a free account at console.gomomento.com [3].
- An AWS account.
- Node.js.
- CDK v2.
A note about Momento Topics
An important thing to note about Momento Topics is that they are virtual. In that, we don’t have to explicitly create a topic first before we use it.
Keep this in mind as we go through this step-by-step guide.
Understanding disposable tokens
Momento has two separate mechanisms for authentication and authorization—API keys and disposable tokens.
For back-end processes, use API keys.
For the front-end, we can generate disposable tokens using the Momento SDK [4]. These tokens can be scoped to specific actions against specific resources.
For example, a token can grant permission to publish and subscribe to a specific topic. If every chat room has a topic, then we can use disposable tokens to control which rooms a user can access.
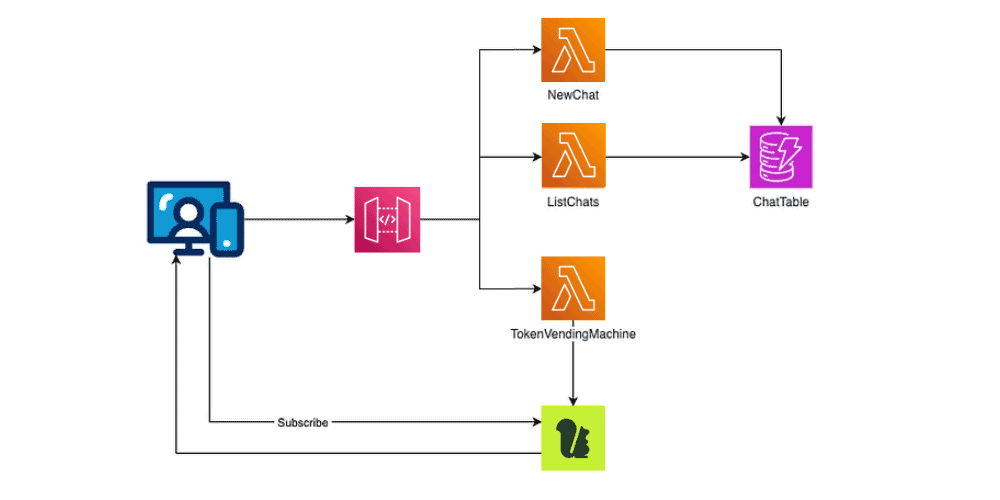
Architecture overview
For this demo, we will build a full-stack application where:
- Once logged in, the user can see a list of the available chat rooms.
- The user can create a new chat room or join one of the available chat rooms.
- The list of chat rooms is stored in DynamoDB.
- Every chat room has an associated topic in Momento.
- When the user joins a chat room, the front-end subscribes to that room’s topic.
- When a user sends a message to the room, the message is published to the topic and delivered to all users in the room.
The API has three routes:
- POST /chats: create a new chat room.
- GET /chats: list the available chat rooms.
- GET /token: generates a disposable token so the front end can subscribe to the Momento Topic.
Here is our overall architecture:
Step 1: Creating a new cache
Momento Topics share the same infrastructure as Momento Cache. So to use topics, we have to first create a cache, odd as it may sound.
Log into the Momento Console and go to “Caches”.

Click “Create cache”.
We will call this new cache “chat” and create it in the “us-east-1” region.
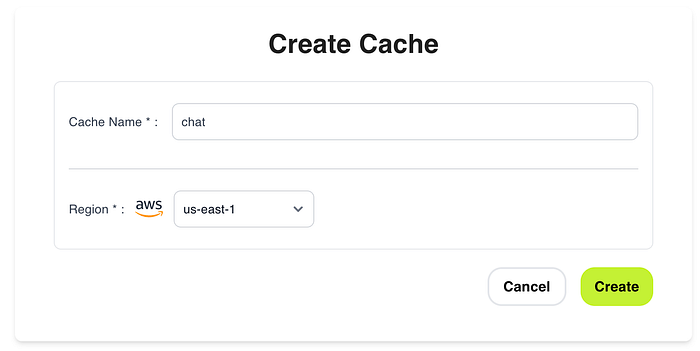
This can also be done through the Momento CLI [5].
Step 2: Generate API key
Momento has two types of API keys:
- Super User Key: This is used to administer caches and topics and generate disposable tokens.
- Fine-Grained Access Key: This is for interacting with Moment caches/topics.
A super user key is required to generate disposable tokens. So, in this case, we need to create a Super User Key.
Go to “API keys” in the Momento Console and generate a new “Super User Key” in the “us-east-1” region.
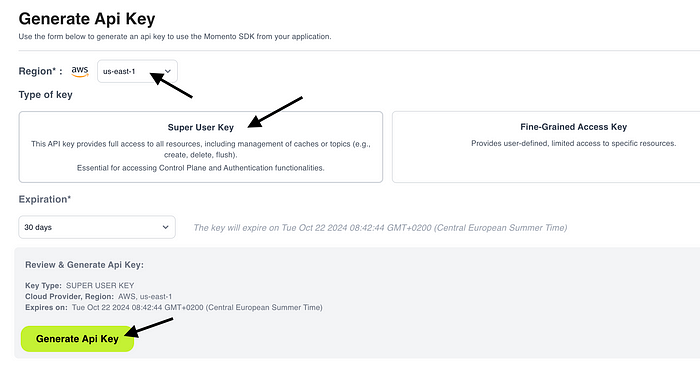
Click “Generate Api Key”.
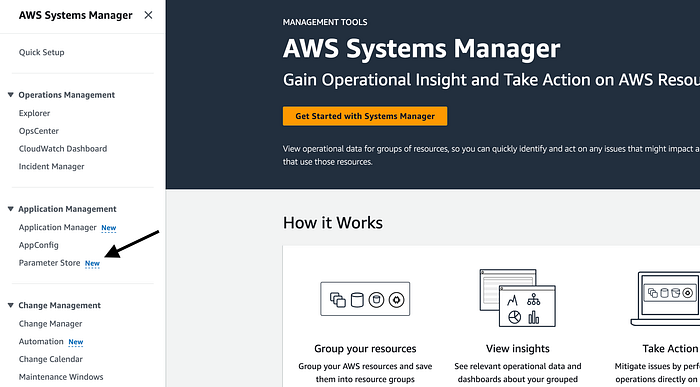
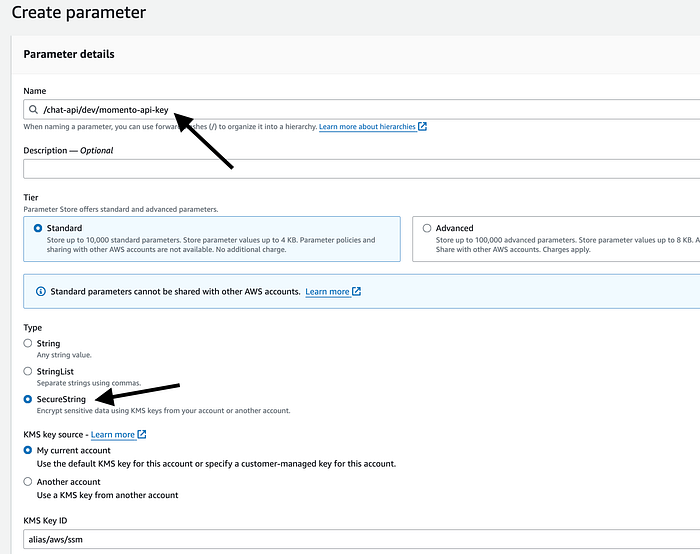
Step 3: Secure the API key
To keep our API key safe, we will store it in the SSM Parameter Store.
Go to the “AWS Systems Manager” console in AWS, click “Parameter Store”.
Create a new parameter, and call the new parameter “/chat-api/dev/momento-api-key”. This is the naming convention I typically use for SSM parameters: /{service-name}/{environment}/{parameter-name}.
Make sure the parameter type is “SecureString”. This ensures the API key is encrypted at rest.
Step 4: Create a CDK app
For this demo, we will use CDK. But we can use any other Infrastructure-as-Code tool, and it will work just as well.
For the CDK app, I want to:
- Support ephemeral environments [6], one of the most impactful practices for serverless development.
- Allow ephemeral environments to reuse SSM parameters [7] from one of the main environments (e.g. dev).
So, we will take in two context variables: stageName and ssmStageName.
The stageName is included in the name of every AWS resource we create to avoid name clashes.
The ssmStageName is used in place of the stageName in every SSM parameter we reference.
With these in mind, here is the CDK app.
#!/usr/bin/env node

const cdk = require('aws-cdk-lib');
const { ChatApiStack } = require('./constructs/chat-api-stack');

const app = new cdk.App();

let stageName = app.node.tryGetContext('stageName');
let ssmStageName = app.node.tryGetContext('ssmStageName');

if (!stageName) {
  console.log('Defaulting stage name to dev');
  stageName = 'dev';
}

if (!ssmStageName) {
  console.log(`Defaulting SSM stage name to "stageName": ${stageName}`);
  ssmStageName = stageName;
}

const serviceName = 'chat-api';

new ChatApiStack(app, `ChatApiStack-${stageName}`, {
  serviceName,
  stageName,
  ssmStageName,
});
And here is the ChatApiStack:
const { Stack, CfnOutput } = require('aws-cdk-lib');
const { Runtime } = require('aws-cdk-lib/aws-lambda');
const { NodejsFunction } = require('aws-cdk-lib/aws-lambda-nodejs');
const { Table, BillingMode, AttributeType } = require('aws-cdk-lib/aws-dynamodb');
const { RestApi, LambdaIntegration, CfnAuthorizer, AuthorizationType } = require('aws-cdk-lib/aws-apigateway');
const iam = require('aws-cdk-lib/aws-iam');
const { UserPool, UserPoolClient } = require('aws-cdk-lib/aws-cognito');

const MOMENTO_CACHE_NAME = 'chat';

class ChatApiStack extends Stack {
  constructor(scope, id, props) {
    super(scope, id, props);

    const api = new RestApi(this, `${props.stageName}-ChatApi`, {
      deployOptions: {
        stageName: props.stageName,
        tracingEnabled: true
      }
    });

    const userPool = new UserPool(this, 'CognitoUserPool', {
      userPoolName: `${props.serviceName}-${props.stageName}-UserPool`,
      selfSignUpEnabled: true,
      signInAliases: { email: true }
    });

    const webUserPoolClient = new UserPoolClient(this, 'WebUserPoolClient', {
      userPool,
      authFlows: {
        userSrp: true
      },
      preventUserExistenceErrors: true
    });

    new CfnOutput(this, 'UserPoolId', { value: userPool.userPoolId });
    new CfnOutput(this, 'UserPoolClientId', { value: webUserPoolClient.userPoolClientId });

    this.momentoApiKeyParamName = `/${props.serviceName}/${props.ssmStageName}/momento-api-key`;
    this.momentoApiKeyParamArn = `arn:aws:ssm:${this.region}:${this.account}:parameter${this.momentoApiKeyParamName}`;

    this.chatsTable = this.createChatsTable();

    const listChatsFunction = this.createListChatsFunction(props);
    const newChatFunction = this.createNewChatFunction(props);
    const tokenVendingMachineFunction = this.createTokenVendingMachineFunction(props);

    this.createApiEndpoints(api, userPool, {
      listChats: listChatsFunction,
      newChat: newChatFunction,
      tokenVendingMachine: tokenVendingMachineFunction
    });
  }

  createChatsTable() {
    return new Table(this, 'ChatsTable', {
      billingMode: BillingMode.PAY_PER_REQUEST,
      partitionKey: {
        name: 'chatName',
        type: AttributeType.STRING
      }
    });
  }

  createListChatsFunction(props) {
    const func = new NodejsFunction(this, 'ListChatsFunction', {
      runtime: Runtime.NODEJS_20_X,
      handler: 'handler',
      entry: 'functions/list-chats.js',
      memorySize: 1024,
      environment: {
        SERVICE_NAME: props.serviceName,
        STAGE_NAME: props.stageName,
        POWERTOOLS_LOG_LEVEL: props.stageName === 'prod' ? 'INFO' : 'DEBUG',
        CHATS_TABLE_NAME: this.chatsTable.tableName
      }
    });

    this.chatsTable.grantReadData(func);

    return func;
  }

  createNewChatFunction(props) {
    const func = new NodejsFunction(this, 'NewChatFunction', {
      runtime: Runtime.NODEJS_20_X,
      handler: 'handler',
      entry: 'functions/new-chat.js',
      memorySize: 1024,
      environment: {
        SERVICE_NAME: props.serviceName,
        STAGE_NAME: props.stageName,
        POWERTOOLS_LOG_LEVEL: props.stageName === 'prod' ? 'INFO' : 'DEBUG',
        CHATS_TABLE_NAME: this.chatsTable.tableName
      }
    });

    this.chatsTable.grantWriteData(func);

    return func;
  }

  createTokenVendingMachineFunction(props) {
    const func = new NodejsFunction(this, 'TokenVendingMachineFunction', {
      runtime: Runtime.NODEJS_20_X,
      handler: 'handler',
      entry: 'functions/token-vending-machine.js',
      memorySize: 1024,
      environment: {
        SERVICE_NAME: props.serviceName,
        STAGE_NAME: props.stageName,
        MOMENTO_API_KEY_PARAM_NAME: this.momentoApiKeyParamName,
        MOMENTO_CACHE_NAME,
        POWERTOOLS_LOG_LEVEL: props.stageName === 'prod' ? 'INFO' : 'DEBUG'
      }
    });

    func.role.attachInlinePolicy(new iam.Policy(this, 'TokenVendingMachineFunctionSsmPolicy', {
      statements: [
        new iam.PolicyStatement({
          effect: iam.Effect.ALLOW,
          actions: [ 'ssm:GetParameter*' ],
          resources: [ this.momentoApiKeyParamArn ]
        })
      ]
    }));

    return func;
  }

  /**
   *
   * @param {RestApi} api
   * @param {UserPool} userPool
   */
  createApiEndpoints(api, userPool, functions) {
    const authorizer = new CfnAuthorizer(this, 'CognitoAuthorizer', {
      name: 'CognitoAuthorizer',
      type: 'COGNITO_USER_POOLS',
      identitySource: 'method.request.header.Authorization',
      providerArns: [userPool.userPoolArn],
      restApiId: api.restApiId,
    });

    const chatsResource = api.root.addResource('chats');

    // POST /chats
    chatsResource.addMethod('POST', new LambdaIntegration(functions.newChat), {
      authorizer: {
        authorizationType: AuthorizationType.COGNITO,
        authorizerId: authorizer.ref
      }
    });

    // GET /chats
    chatsResource.addMethod('GET', new LambdaIntegration(functions.listChats), {
      authorizer: {
        authorizationType: AuthorizationType.COGNITO,
        authorizerId: authorizer.ref
      }
    });

    chatsResource.addCorsPreflight({
      allowHeaders: ['*'],
      allowMethods: ['OPTIONS', 'GET', 'POST'],
      allowCredentials: true,
      allowOrigins: ['*']
    });

    // GET /token
    const tokenResource = api.root.addResource('token');
    tokenResource.addMethod('GET', new LambdaIntegration(functions.tokenVendingMachine), {
      authorizer: {
        authorizationType: AuthorizationType.COGNITO,
        authorizerId: authorizer.ref
      }
    });

    tokenResource.addCorsPreflight({
      allowHeaders: ['*'],
      allowMethods: ['OPTIONS', 'POST'],
      allowCredentials: true,
      allowOrigins: ['*']
    });
  }
}

module.exports = { ChatApiStack }
Here, we created an API in API Gateway and three Lambda functions to implement the aforementioned routes:
- TokenVendingMachineFunction
- NewChatFunction
- ListChatsFunction
Authentication and Authorization
The API is secured by a Cognito authorizer.
const authorizer = new CfnAuthorizer(this, 'CognitoAuthorizer', {
  name: 'CognitoAuthorizer',
  type: 'COGNITO_USER_POOLS',
  identitySource: 'method.request.header.Authorization',
  providerArns: [userPool.userPoolArn],
  restApiId: api.restApiId,
});
Loading SSM parameters securely
Notice that our functions did not include the Momento API key as an environment variable. Instead, we pass along the name of the parameter:
environment: {
  SERVICE_NAME: props.serviceName,
  STAGE_NAME: props.stageName,
  MOMENTO_API_KEY_PARAM_NAME: this.momentoApiKeyParamName,
  MOMENTO_CACHE_NAME,
  POWERTOOLS_LOG_LEVEL: props.stageName === 'prod' ? 'INFO' : 'DEBUG'
}
and we give the function the IAM permission to fetch the parameter at runtime.
func.role.attachInlinePolicy(new iam.Policy(this, 'TokenVendingMachineFunctionSsmPolicy', {
  statements: [
    new iam.PolicyStatement({
      effect: iam.Effect.ALLOW,
      actions: [ 'ssm:GetParameter*' ],
      resources: [ this.momentoApiKeyParamArn ]
    })
  ]
}));
This is so that:
- We protect ourselves against compromised dependencies from stealing information from environment variables.
- We can use short expirations for our API keys and rotate them without redeploying the application.
During cold start, a function will fetch the SSM parameter, decrypt it and cache its value for a few minutes. After the cache expiry, the next invocation will attempt to fetch an updated value from the SSM Parameter store.
This way, we don’t need to call SSM on every invocation. When we rotate the API key in the background (with a cron job), our functions automatically pick up the new key after its cache expires.
Luckily, Middy’s ssm middleware [8] supports this flow out-of-the-box. We will let it handle the heavy lifting, but more on this later!
Example workflow
When I start working on a JIRA ticket “ABP-1734”, I will:
- Create a feature branch
ABP-1734. - Create an ephemeral environment by running
cdk deploy --context stageName=FEAT-ABP-1734 --context ssmStageName=dev. This creates a new instance of our chat API so I can work on my changes in isolation. This new environment will use thedevSSM parameters, but all its resources will have theFEAT-ABP-1734suffix. - I make my changes, test them and create a PR.
- I delete the ephemeral environment by running
cdk destroy --context stageName=FEAT-ABP-1734 --context ssmStageName=dev.
These short-lived environments are useful for feature development as well as running tests in CI/CD pipelines. Thanks to pay-per-use pricing, we can have as many environments as we need without incurring additional costs.
Ideally, we’d have one Momento cache per environment, too. In that case, the name of the cache should be prefixed or suffixed with stageName.
Step 5: Implement the TokenVendingMachine function
Here’s the code for the TokenVendingMachine function behind the GET /token route:
const { initAuthClient, generateToken } = require('../lib/momento');
const middy = require('@middy/core');
const cors = require('@middy/http-cors');
const ssm = require('@middy/ssm');

module.exports.handler = middy(async (event, context) => {
  await initAuthClient(context.MOMENTO_API_KEY);

  const tokenResult = await generateToken();

  return {
    statusCode: 200,
    body: JSON.stringify(tokenResult)
  }
})
.use(cors())
.use(ssm({
  cache: true,
  cacheExpiry: 5 * 60 * 1000,
  setToContext: true,
  fetchData: {
    MOMENTO_API_KEY: process.env.MOMENTO_API_KEY_PARAM_NAME
  }
}));
Here, we use Middy’s ssm middleware [8] to fetch and cache the Momento API key from SSM Parameter Store.
.use(ssm({
  cache: true,
  cacheExpiry: 5 * 60 * 1000,
  setToContext: true,
  fetchData: {
    MOMENTO_API_KEY: process.env.MOMENTO_API_KEY_PARAM_NAME
  }
}));
By default, the middleware injects the fetched data into environment variables. However, as stated before, we should avoid putting unencrypted API keys in the Lambda functions’ environment variables. Attackers would often scan environment variables for sensitive information.
So, we ask the middleware to set the fetched data to Lambda’s invocation context object instead. Therefore, when we initialize the Momento client, we have to get the Momento API key from context.MOMENTO_API_KEY.
await initAuthClient(context.MOMENTO_API_KEY);Encapsulating shared logic
As per the earlier snippet, I have encapsulated all the Momento-related operations into a shared momento.js module.
This includes shared logic, such as initializing a Momento auth client.
const {
  CredentialProvider,
  AuthClient,
  DisposableTokenScopes,
  ExpiresIn,
  GenerateDisposableTokenResponse,
  AllTopics,
} = require('@gomomento/sdk');

const { Logger } = require('@aws-lambda-powertools/logger');
const logger = new Logger({ serviceName: 'leaderboard-api' });

const { MOMENTO_CACHE_NAME } = global.process.env;

let authClient;

async function initAuthClient(apiKey) {
  if (!authClient) {
    logger.info('Initializing Momento auth client');

    authClient = new AuthClient({
      credentialProvider: CredentialProvider.fromString(apiKey)
    });

    logger.info('Initialized Momento auth client');
  }
};

async function generateToken() {
  const result = await authClient.generateDisposableToken(
    DisposableTokenScopes.topicPublishSubscribe(MOMENTO_CACHE_NAME, AllTopics),
    ExpiresIn.minutes(30)
  );

  return {
    endpoint: result.endpoint,
    token: result.authToken,
    cacheName: MOMENTO_CACHE_NAME,
    expiresAt: result.expiresAt
  };
}

module.exports = {
  initAuthClient,
  generateToken,
};
Here, we are taking advantage of the fact that Lambda execution environments are reused.
When a new execution environment is created (during a cold start), the authClient variable is set. On subsequent invocations on the same execution environment, the initAuthClient function will short-circuit and return right away.
Fine-grained authorization
Pay attention to this line:
const result = await authClient.generateDisposableToken(
  DisposableTokenScopes.topicPublishSubscribe(MOMENTO_CACHE_NAME, AllTopics),
  ExpiresIn.minutes(30)
);
Here, we are generating a short-lived token that can publish and subscribe to all topics in the “chat” cache. This is rather permissive and allows users to join and send messages to any chat room.
This is fine for our demo, as all of our chat rooms are public. But in the real world, we would likely have private chat rooms too. In that case, we must reduce the DisposableTokenScopes to a subset of topics based on the user’s permissions.
Step 6: Implement the ListChats function
Here’s the code for the ListChats function behind the GET /chats route:
const { DynamoDB } = require("@aws-sdk/client-dynamodb");
const { DynamoDBDocumentClient, ScanCommand } = require("@aws-sdk/lib-dynamodb");
const dynamodbClient = new DynamoDB();
const dynamodb = DynamoDBDocumentClient.from(dynamodbClient);
const middy = require('@middy/core');
const cors = require('@middy/http-cors');

module.exports.handler = middy(async () => {
  const { Items } = await dynamodb.send(new ScanCommand({
    TableName: process.env.CHATS_TABLE_NAME
  }))

  const chats = Items.map(x => ({ chatName: x.chatName }))
  return {
    statusCode: 200,
    body: JSON.stringify(chats)
  }
})
.use(cors());
This function performs a scan against the ChatsTable DynamoDB table to fetch all the available tables.
Step 7: Implement the NewChat function
Here’s the code for the NewChat function behind the POST /chats route:
const { DynamoDB } = require("@aws-sdk/client-dynamodb");
const { DynamoDBDocumentClient, PutCommand } = require("@aws-sdk/lib-dynamodb");
const dynamodbClient = new DynamoDB();
const dynamodb = DynamoDBDocumentClient.from(dynamodbClient);
const middy = require('@middy/core');
const cors = require('@middy/http-cors');

module.exports.handler = middy(async (event) => {
  const { chatName } = JSON.parse(event.body);
  const chat = { chatName };

  await dynamodb.send(new PutCommand({
    TableName: process.env.CHATS_TABLE_NAME,
    Item: chat,
    ConditionExpression: "attribute_not_exists(chatName)"
  }));

  return {
    statusCode: 201,
    body: JSON.stringify(chat)
  };
})
.use(cors());
For brevity, we kept the ChatsTable DynamoDB table simple.
As a reminder, this is the CDK code that created the table:
createChatsTable() {
  return new Table(this, 'ChatsTable', {
    billingMode: BillingMode.PAY_PER_REQUEST,
    partitionKey: {
      name: 'chatName',
      type: AttributeType.STRING
    }
  });
}
The table has a hash key called chatName. This means it’s impossible to have duplicated chat room names.
It’s common to include additional metadata about chat rooms — e.g. when they were created, who created them and so on.
We have omitted these metadata in this demo. But to add a pinch of realism, we do not want the PutCommand to override an existing chat room if one already exists with the same name. This is why we included a ConditionExpression to stop that from happening.
await dynamodb.send(new PutCommand({
  TableName: process.env.CHATS_TABLE_NAME,
  Item: chat,
  ConditionExpression: "attribute_not_exists(chatName)"
}));
Step 8: Subscribe to the topic in the frontend
We’re not going to go through all the frontend code in detail because most of it is not relevant to dealing with real-time messaging. All the code is in the demo repo [2] under the frontend directory.
Here are the important bits.
After a user signs in, we:
1. Call the GET /token endpoint with the user’s ID token to fetch a disposable token.
2. Call the GET /chats endpoint to list the available chat rooms.
3. When the user clicks on one of the chat rooms, subscribe to the room’s topic via the joinChat function below.
import { subscribeToTopic } from '@/lib/momento'

let subscription = null

const chatMessages = ref([])
const isConnected = ref(false)

...

const joinChat = async (chatName) => {
  if (subscription) {
    console.log('Unsubscribing from existing chat...')
    await subscription.unsubscribe()

    isConnected.value = false
    chatMessages.value = []
  }

  console.log('Subscribing to chat:', chatName)
  subscription = await subscribeToTopic(
    momentoToken,
    momentoCacheName,
    chatName,
    (jsonMsg) => {
      const { sender, message } = JSON.parse(jsonMsg)
      chatMessages.value.push({ sender, message })
    })

  isConnected.value = true
}
There are couple of things to note here.
First, to ensure we are connected to only one room at a time, we always unsubscribe from the current topic first.
if (subscription) {
  console.log('Unsubscribing from existing chat...')
  await subscription.unsubscribe()

  isConnected.value = false
  chatMessages.value = []
}
Second, when we subscribe to a Momento Topic, we pass a delegate function to handle when a new message is received from the topic.
subscription = await subscribeToTopic(
  momentoToken,
  momentoCacheName,
  chatName,
  (jsonMsg) => {
    const { sender, message } = JSON.parse(jsonMsg)
    chatMessages.value.push({ sender, message })
  })
We are making some assumptions here, that:
- The message is a JSON string.
- The JSON object contains a
sender(an email) and amessage.
This means, when we send messages to the topic, we must include both in the message.
But, what’s this subscription object? To understand that, let’s look at the subscribeToTopic helper function.
import {
  TopicClient,
  TopicConfigurations,
  CredentialProvider
} from '@gomomento/sdk-web'

async function subscribeToTopic(authToken, cacheName, topicName, onMessage) {
  console.log('Initializing Momento topic client', authToken)

  const topicClient = new TopicClient({
    configuration: TopicConfigurations.Browser.latest(),
    credentialProvider: CredentialProvider.fromString({
      authToken
    })
  })

  console.log('Initialized Momento topic client')
  console.log('Subscribing to Momento topic:', { cacheName, topicName })

  const resp = await topicClient.subscribe(cacheName, topicName, {
    onItem: (item => onMessage(item.value()))
  })

  if (!resp.isSubscribed) {
    const error = resp.innerException()
    console.error(`Failed to subscribe to Momento topic [${topicName}]: `, error)
    throw error
  }

  return {
    send: async (message) => {
      await topicClient.publish(cacheName, topicName, message)
    },
    unsubscribe: async () => await resp.unsubscribe()
  }
}
The most important line is this:
const resp = await topicClient.subscribe(cacheName, topicName, {
  onItem: (item => onMessage(item.value()))
})
This is how we subscribe to the topic. When a message is received, it’s handled by the aforementioned delegate function.
Unfortunately, we need the topicClient to send messages to the topic. And we need the subscribe response to unsubscribe from the topic.
To avoid a leaky abstraction, this helper function returns an object that allows the UI component to send messages to the topic and to unsubscribe from it.
return {
  send: async (message) => {
    await topicClient.publish(cacheName, topicName, message)
  },
  unsubscribe: async () => await resp.unsubscribe()
}
This is the subscription object we saw earlier.
Step 9: Send messages to the topic
Once we are connected to a topic, we can use the aforementioned subscription object to send messages to the topic.
const sendMessage = async () => {
  await subscription.send(JSON.stringify({
    sender: currentUserEmail.value,
    message: newMessage.value
  }))

  newMessage.value = ''
}
As discussed earlier, we need to include the sender’s email and message as JSON. Because that’s what we expect to receive in the subscribe function.
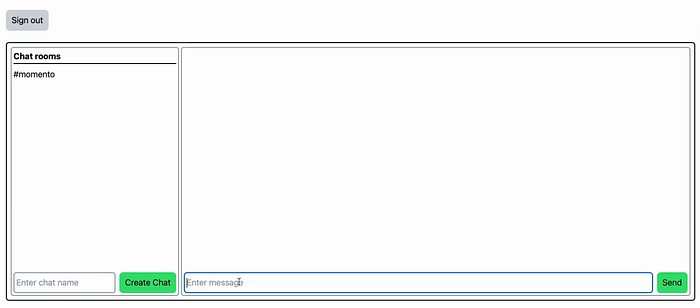
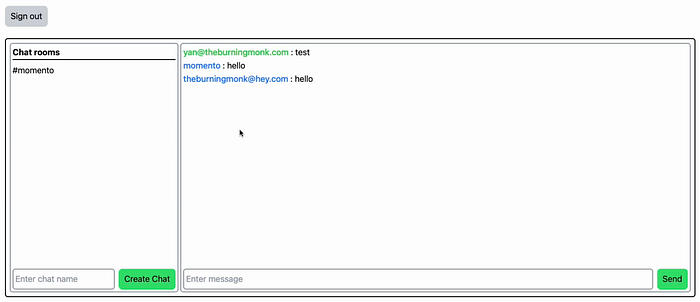
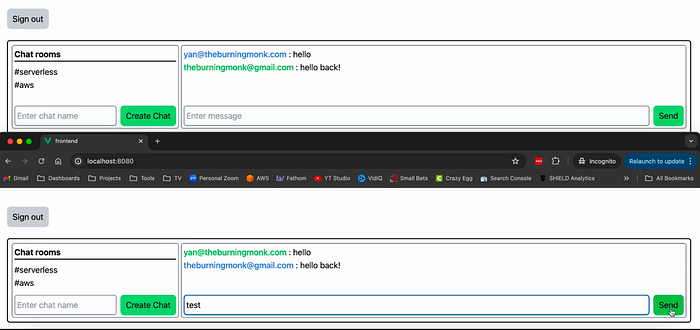
And that’s it! Now we have a real-time chat application that allows users to communicate with each other in real time. The conversations are organized into chat rooms and users can join and create chat rooms.
You can run multiple instances of the application in different browsers, or make use of incognito windows. That way, you can send messages to a chat room and see the message appear instantly in the other user’s window.
Step 10: Deploy and Test
Finally, run cdk deploy and test it out!
If you want to see how it works in action, then check out the full course here [9].

Links
[1] Learn more about Momento topics
[2] Demo repo
[3] Momento Console
[4] Momento SDKs
[5] Momento CLI
[6] Serverless Ephemeral Environments Explained
[7] Ephemeral Environments: how to reuse SSM parameters
[9] [FULL COURSE] Building real-time apps with Momento
Share